All Posts By

Martyna

International Banana Museum by Salton Sea. Keep Calm and Eat a Banana!

Before you read further the post, do me a favor grab a banana and eat it! Thank you! Last spring for my birthday I just wanted a little party and a road trip to an apocalyptic place – Salton Sea. Around the Salton Sea there are many weird things to see and do and one of those places is the International Banana Museum. Who knows me a little or worked with me, are aware of my banana a day habit. Bananas are good for you, they are tasty, yellow and just so filling. I am so glad there is a banana museum nearby San Diego. Oh… and my gaming name, if it’s not taken is always a Banana Queen. So I felt as a true Banana Queen I must to visit the Banana Museum, the most bananaanananananaana place of all!

About International Banana Museum at the Salton Sea.

  • It has over 20,000 banana related items.
  • There is a small fee ( 1-2$) to enter unless you buy something.
  • They are open from Friday to Monday 11AM to 7.30PM ( but I would call/email before going as it is run by a man who uses its own free time for that).
  • I would highly suggest to try a banana shake! Its really good.

The Banana Museum is in Mecca California near Salton Sea. It’s quite easy to see it from a driving a car as it has a big sign in front. The museum is not big, just a one big room with a bar. ( I assume at some point it was a bar).  Everywhere you look there are B-A-N-A-N-A-S! Starting from little statues to the food items that contains bananas. There is a bar and you can order a banana drink or meal. Since March is already a hot month in the desert me and all Mr.J’s family got banana shakes and it was one of the best banana shake I ever had. Mr.J’s mom was kind and got for my birthday International Banana Museum shirt that I wore to my party and I couldn’t be happier. Ok, enough words time for the pictures, so scroll down and enjoy them. This post I am writing to everyone that are dreaming about summer and warmth, hope it will make you a little warmer.

Girl standing by International Banana Museum Inside of Interantional Banana Musesum Inside in the international banana musesum Girl standing by a shelving unit with banana items A lot of banana related items in the banana musesum Banana Museum items Banana Museum exposition Girl wearing yellow hat and jacket Banana exposition Banana Museum items

Make your own down booties on a budget for cold feet.

Down Booties at the beach

There is nothing worse than after a long backpacking day get into a sleeping bag and wake up in the middle of the night with cold feet. That happens to me constantly when we go backpacking not in summer season. I have tried everything: wearing multiple dry socks, wearing grandma’s knitted woolen socks alone and with other socks, but I would still wake up with cold toes. And if feet are cold the whole body will get cold too and is impossible to go back to sleep. So I started thinking about other ways how to get rid of cold feet  in my sleeping bag? A new warmer sleeping bag cost too much and I am fine with the one I have. To buy down booties cost $50-100 and I didn’t want to spend that much money either. Since I know how to sew I decided to use my skills to make my own down booties/slippers. It was a long process as I was looking not only that booties would keep me warm but also that it would look good. I found couple patterns people used before in different backpacking forums but something was not working for me when I tried to make it myself. So I created my own pattern and decided to share it with you.

STEP 1.  Get your supplies

  • 1 yard of rip stop nylon. ( I got mine from http://zpacks.com/ I chose 2 yards of Ventum Ripstop Nylon but 1 yard is enough if you are not planning on making more things).
  • Some high quality down, I would suggest to go to your local thrift shop and get a puffy jacket and use the down from it.
  • Some paper to make your own pattern, pen & measurement tape   
  • Sewing machine and nylon thread.

STEP 2. Make the pattern.

  • First, trace your feet on the paper it will be your down booty sole. Add ⅝ of an inch ( or 1,5 cm) on a side it will be your sewing allowance, cut the pattern.
  • Take a measurement tape and measure from your longest toe to the ankle the part that bends and subtract an inch.
  • Measure from the middle of the toes following the measuring tape around the feet to the heel. Add ⅝ of an inch ( or 1.5 cm) for seam allowance.
  • Use the sole pattern to guide you how wide the hole for your ankle should be.
  • Make a rectangle, the length of it should be the circumference of your boot part and the width its up to you how long you want the sock to be ( mine was 4 inches or 10 cm). Multiply width by 2 and draw your rectangle that now is 8 inches ( 20 cm ) width and the length stays the same.

STEP 3. Make the down booties/socks.

  • Cut the rest 2 pieces of the pattern.
  • Place all 3 pattern pieces on the fabric and pin them to the fabric ( Make sure to fold your fabric in half before).
  • Cut your pieces.
  • Repeat steps above for the second bootie.
  • Now you should have 4 pieces of sole, 4 pieces of boot part and 2 pieces of sock piece.
  • Take 2 sole pieces and sew together by leaving a small opening for stuffing the down inside. Repeat the step with the rest of the pattern pieces except the sock part. Fold sock part in half and sew it.
  • Stuff the down through the openings.
  • Hand sew shut the openings.
  • Sew all 3 pieces together.

And here you go, you just made yourself down booties/ slippers. Wear them while you sleep on your next backpacking/camping trip and don’t get cold feet anymore. And for all of you who are obsessed with ultralight backpacking these down booties don’t take space and are super light! So don’t wait grab your grandma’s sewing machine and do it yourself! On your next backpacking trip your cold feet will thank you!

Pattern of down booties Placing down booties pattern pieces on the fabric 3 down booties pattern pieces on the fabric Pinning down booties pattern pieces to the fabric Filling down booties with down Three down booties pieces filled with down Do it yourself down booties Wearing down booties in sleeping bag Down booties Down booties on backpacking trip

Backpacking thru Trans-Catalina Trail in Catalina Island: cactuses, buffalos, rain and more!

Overlook from the top one of the Catalina ISland harbours

Thanksgiving is coming that means it is time to plan another backpacking/adventure trip. Every year me and Mr.J instead of stuffing our bellies with food we go and explore new places. I started looking around what we will do this year ( it is always kind of last minute planning) but I remembered that I never shared what we did last year. So last Thanksgiving I celebrated by thru backpacking Trans- Catalina Trail. Trans-Catalina trail is located in the Catalina island around 22 miles ( 35 km) south of Los Angeles. The only way to reach the island is by a helicopter or plane ( if you are rich), by a ferry or with your own boat! The island is 22 miles (35 km) length and 8 (13 km) miles across at the greatest width. I took some backpacking diary/notes during this backpacking adventure and I will share them here. It was one of the most adventurous backpacking trips we went on.

  • I enjoyed that we did not need to pack too much food, there are restaurants on the way.
  • The campsites were tidy and some of them had toilets and running water.
  • Catalina Island is full of wonderful plants and animals.
  • The terrain was not as horrible as I expected and overall it wasn’t as hard.
  • If there is any chance of rain, most likely it will rain so be prepared for that.
  • Be prepared to meet with buffalos and give them some distance if they are on your way.

Day 1. Nov 25th – Wednesday. Ferry to Catalina island – Avalon

Wild ocean = intense ferry ride. The whole first floor of boy scouts puked all over. I was just praying for the ferry to reach the Catalina Island safely. The ferry that was supposed to go after ours was canceled so I guess it was really wild ocean that morning. We took a ferry to Avalon, the first thing you will notice – golf carts are used as transportation everywhere! ( small space doesn’t require cars). The island has tons of woodpeckers, they make little round holes in trees, palmtrees and even fences and fill them with acorns. Overall Avalon is a cute tourist town with hotels, bars and shops. We had early dinner in the town and went back to the to the campsite to sleep at 6.00 pm.

Cute houses and golf carts in Catalina Island i

Golf Carts in Avalon Catalina Island Wrigley Memorial & Botanic Garden Building Avalon shore in Catalina Island Avalon beach and pier, Catalina Island

Day 2. Nov 26th – Thursday. Starting hiking Trans-Catalina Trail. Avalon – Airport in the sky – Little Harbor 14,5 miles ( 23,3 km)

“That Buffalo scared me. I thought we were goners ” – Mr. J.

Did I mention that Catalina island is full of wild buffalos that can totally destroy your hike by blocking the trail? That happened to us  twice! Buffalos are not native to the island, they were brought for a movie in the 30’s and was left. These days the population is regulated to keep around 150 them on the island.

Little Harbor was the second campsite on this trip we were staying. We started hiking at 4.00am right before the sunset, but it was still completely dark. We took Hermit Gulch Trail till we reached the top of the mountain, had breakfast and watched the sunrise. Only now I  could actually see that we were surrounded by the ocean. As we hiked we encountered our first buffalo who was standing and not moving right in front of the gates where we needed to go. We tried to walk around it and looks like it worked. Later that day we saw in the far distance a group of 40 buffalos enjoying their day in the sun. Right in the middle of Avalon and Little Harbor there is an Airport in the sky technically tiny airport and a restaurant that is famous for its buffalo burgers, delicious chocolate chip cookies, and tasty lemonade.  The Second half of the trail had scenic views of the ocean and cliffs. We reached the Little Harbor Campsite early in the evening, it was a beautiful campsite right near the beach with drinking water and portable toilets. We spend the evening at the beach looking at the sunset and relaxing.

Sunrise at Catalina Island. Buffalo at Catalina Island A girl backpacker standing by the sign of Trans-Catalina Trail View from the tp of the mountain of Catalina Island

Airport in the sky at Catalina Island Buffalo burger with fries A backpacker hiking thru Trans-Catalina Trail Little Harbor Campsite

Day 3. Nov 27th – Friday. Little Harbour – Two Harbors – Parsons’ Landing 13,2 miles ( 21,2 km)

Woke up at 11.30pm from the rain hitting the tent. I thought it will be a short one but it was raining all night till 4.00 am and I spent half of the night panicking that we will get soaking wet. Got up at 5.00 am to find out that the only spot in the campsite that was not flooded was where we placed the tent. Neighbors were not as lucky as we were. We started hiking again the trail from the campsite went to the top of the mountain, it was quite muddy and slippery, but the views were stunning! When we reached Two Harbors, we were super muddy. Two Harbors is another little harbor town with one bar and a consignment type store. If you ever get to Two Harbors go to the bar and order Buffalo milk, you won’t regret. We had lunch and started hiking to Parsons’ Landing campsite. This campsite is located at the beach and has only 5 campsites. These campsites need to be reserved in advance. We reached the campsite around 3:15pm. We were already quite tired but we thought it would be cool to quickly place a tent, leave all of our stuff at the campsite and try to reach Starlight Beach ( the end of the Trans Catalina Trail) , but it was another 4.3 miles one way. So we decided just to walk as much as we could till it gets darker and turn around. So after an hour or so of hiking it got a little darker and we turned around to walk back to the campsite. As we walk down the mountain I could see the campsite. Couple buffalos were wondering around and I jokingly said while pointing at one of the buffalos: ” Wouldn’t be funny if that buffalo would start walking towards us?”.  And just let me explain that the road that takes to go to Starlight Beach is located right in the middle of the  canyon and it’s the only way to get there. And as we keep going closer to the intersection the buffalo kept walking towards us. Not too long, he crosses that tiny canyon road and we knew we were in trouble. We stopped and waited for the beast to show up since from there we were unable to locate it. It got dark we needed to turn our headlamps on and it was not funny anymore. Somehow after an hour of waiting and checking where the animal was, we saw green reflecting eyes in the dark. It was creepy (buffalos are stubborn and not friendly at all) and it didn’t look that it was planning to go anywhere else when after sometime he moved away and we could safely come back to the campsite. We spent the evening by the fire laughing from what just happened and went to sleep with ocean waves just steps away.

A hiker at Catalina Island, Little HArbourCouple at Catalina Island with the rainbow Boats at Catalina Island harbour Parsons Landing campsite at Catalina IslandSunset at Parsons Landing campground


Day 4. Nov 28th – Saturday. Parsons’ Landing – Little Harbor 12,5 miles ( 20,1 km)

We didn’t set the alarm clock that morning but still woke up before the sunrise. We stayed in the tent for a while and enjoyed the view of waking Los Angeles. We ate breakfast and hiked back to Two Harbors via a different trail. In Two Harbors we were waiting for couple hours for a ferry as we waited I was enjoying Buffalo Milk cocktail. The ferry ride back to LA was way smoother than I expected the ocean was flat.

Backpacker at Catalina Island Backpacker on Trans Catalina trail on Catalina ISland

If you are interested in my previous years Thanksgiving trips read how we went backpacking in Zion National Park in Utah or the road trip to Grand Canyon and Las Vegas 


Working as a SEO specialist ruined the joy of blogging

I have never thought that my SEO job can interfere with blogging. Before I knew about SEO, blogging was just a fun way to express myself without any limitations. I did not seek a wide range of readers, it was more for myself and family to know what I am doing. Kind of like my personal but the same time public diary, until the day I started learning about SEO and all its glory.

Keywords

After I learnt what a proper keyword research is, I have never seen blogging as fun, no time and effort requiring hobby. Before all I needed was:

  • Adventures to write about
  • Inspiration
  • Couple hours to actually to write the post, select the images, and done!

Reality Now:

  • 30 min to do keyword research
  • Stock competitors
  • Wrote the post
  • Review if all the keywords, links are in place
  • Create Title tag & Meta description
  • All of that takes two days!

Images

Before: 

  • Select up to 20 images
  • Upload
  • DONE!

Now: 

  • Select 10-15 images
  • Edit the images
  • Resize them & compress the for better load times and user experience.
  • Upload
  • Write captions, title, alt-tags

These are just two little things that are part of an image of having a healthy SEO friendly blog. I have a dilemma with myself I really want to go back into blogging, should I just push away all the SEO knowledge I have and just start writing as I used to do before or actually plan my time for less post but SEO friendly posts?

I am very interested if anyone else ever had similar struggles. Please share your experience.

P.S Struggle is real every single day, for example when your shoelaces keep untying every couple minutes.

Young woman tying shoelaces

Slot Canyon Hike in Anza Borrego Desert

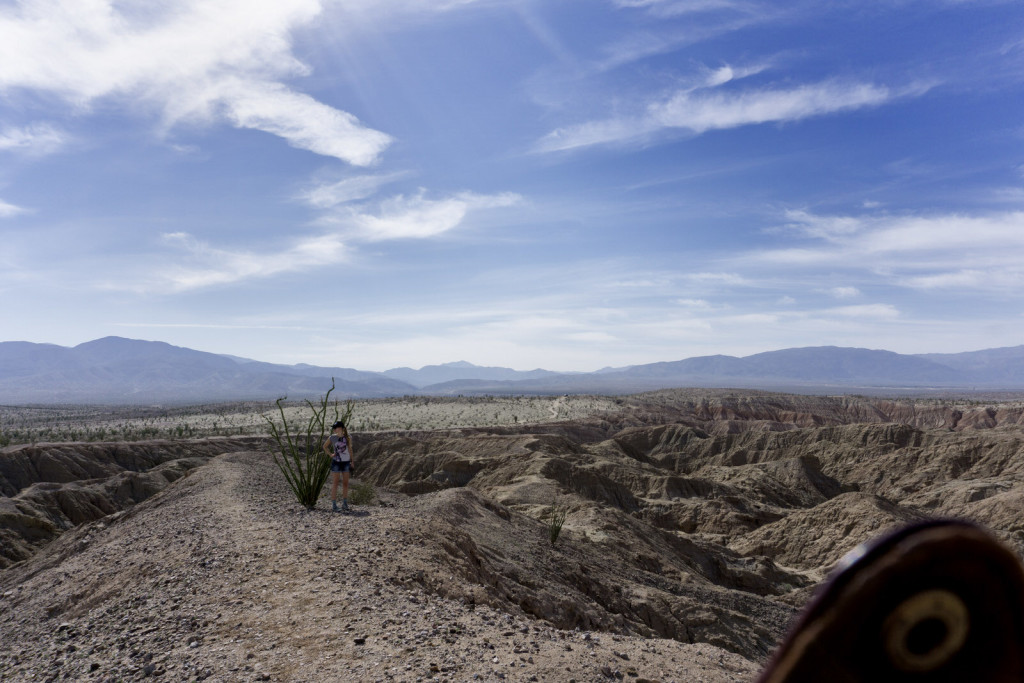
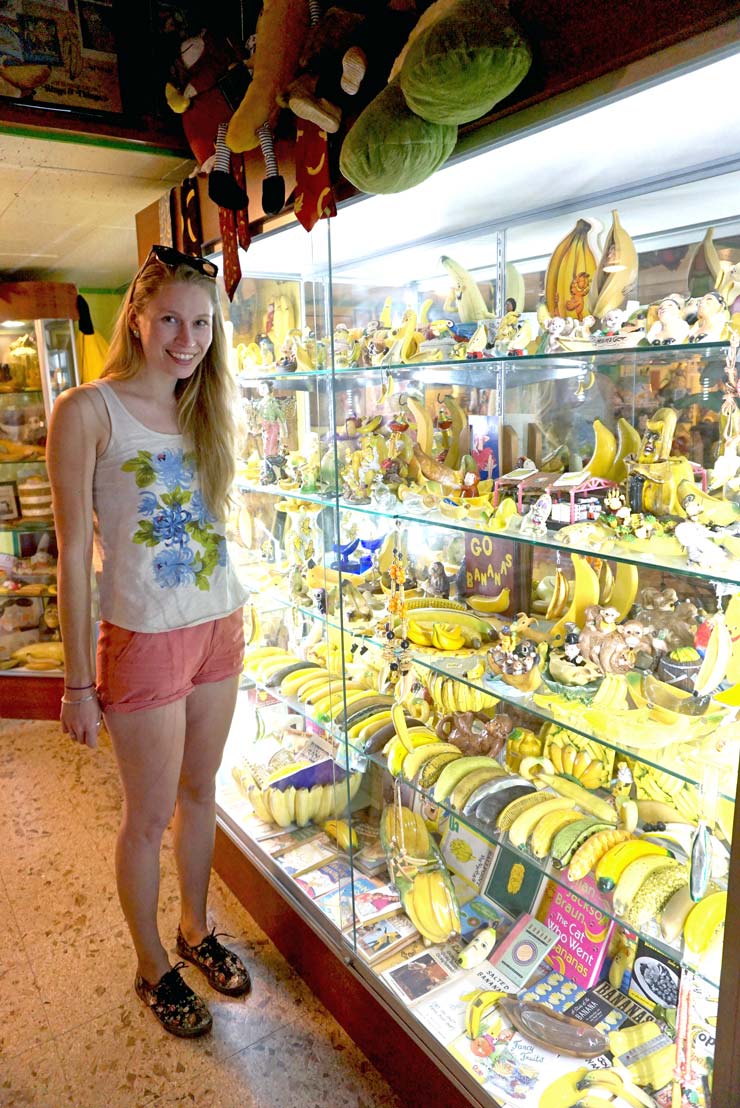
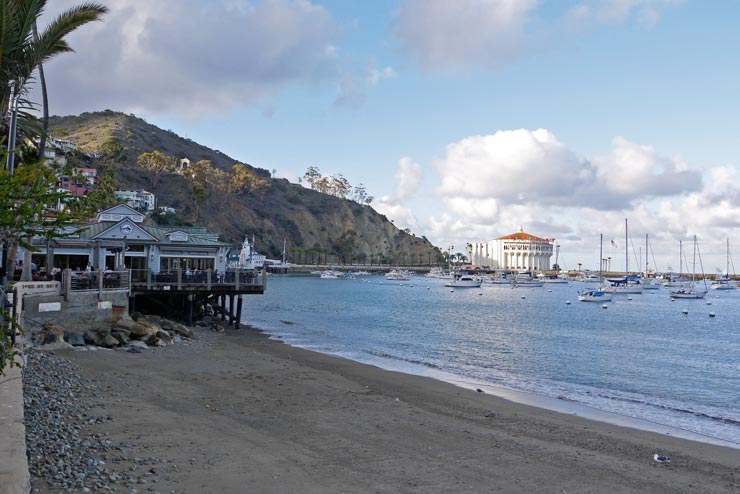
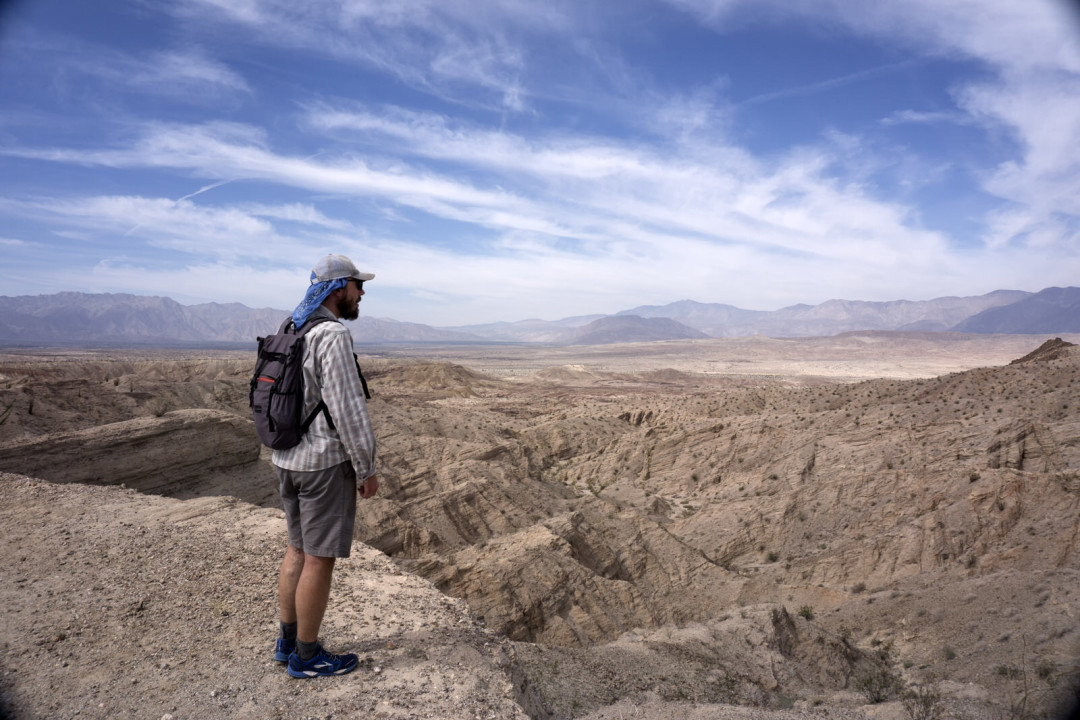
Anza Borrego desert is one of my favorite places to visit. There are miles of trails, hidden places and gems with unique landscapes, plants, rocks and much more, just have time to explore all of it. When I found out that there is a slot canyon I had to see myself.

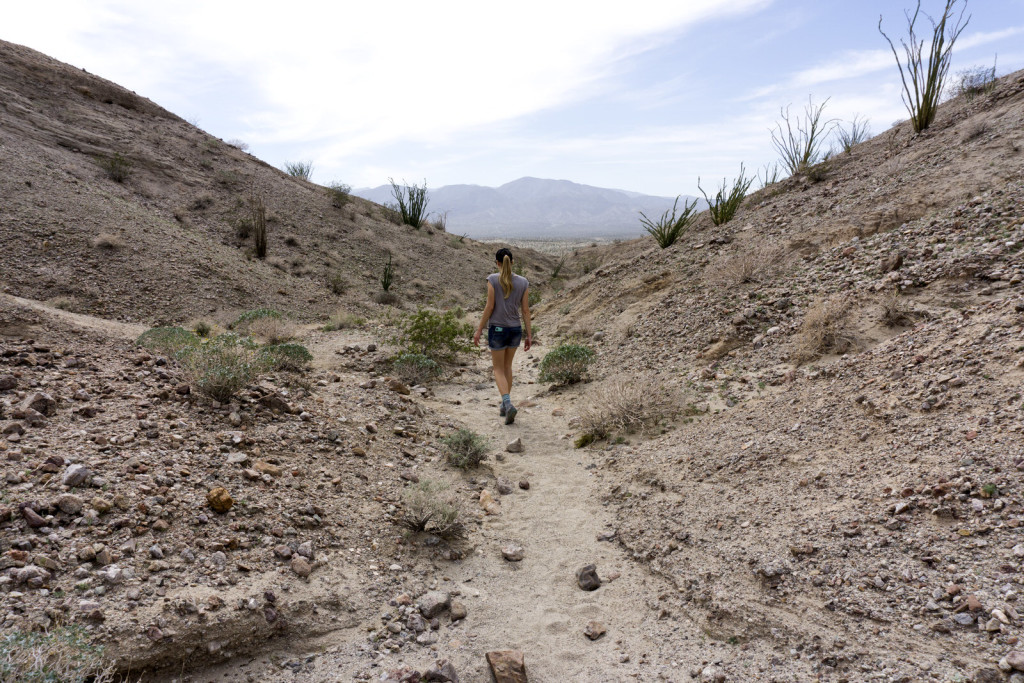
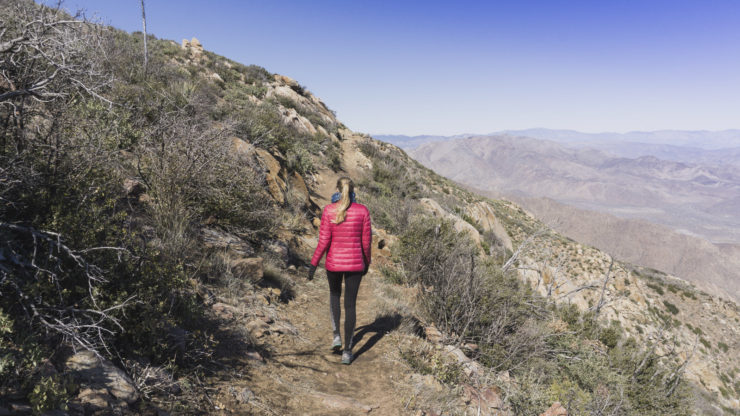
The slot canyon trail  is an easy family friendly hike (0.8-mile length), but if you are sensitive to high temperatures like I am, I would suggest visiting this place in winter or spring when temperatures are not as high. Bring plenty of water, sunscreen protection and a good camera to take lots of pictures of the beautiful canyon.

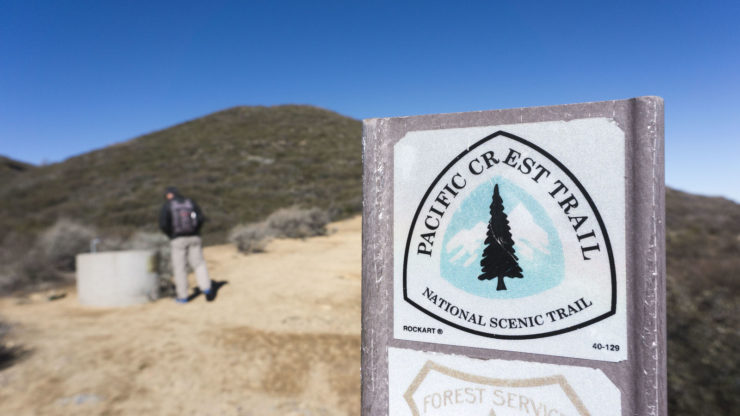
The slot canyon is marked on the map but it is still quite challenging to get there, so before you go, make sure to plan your trip ahead. From Highway 78 East, turn left on Buttes Pass dirt road and follow till the end, you will see a little “parking lot” where you should leave your car and start the hike. The entrance of the trail is easy to miss but generally you should go down and start hiking to the left if that make sense.

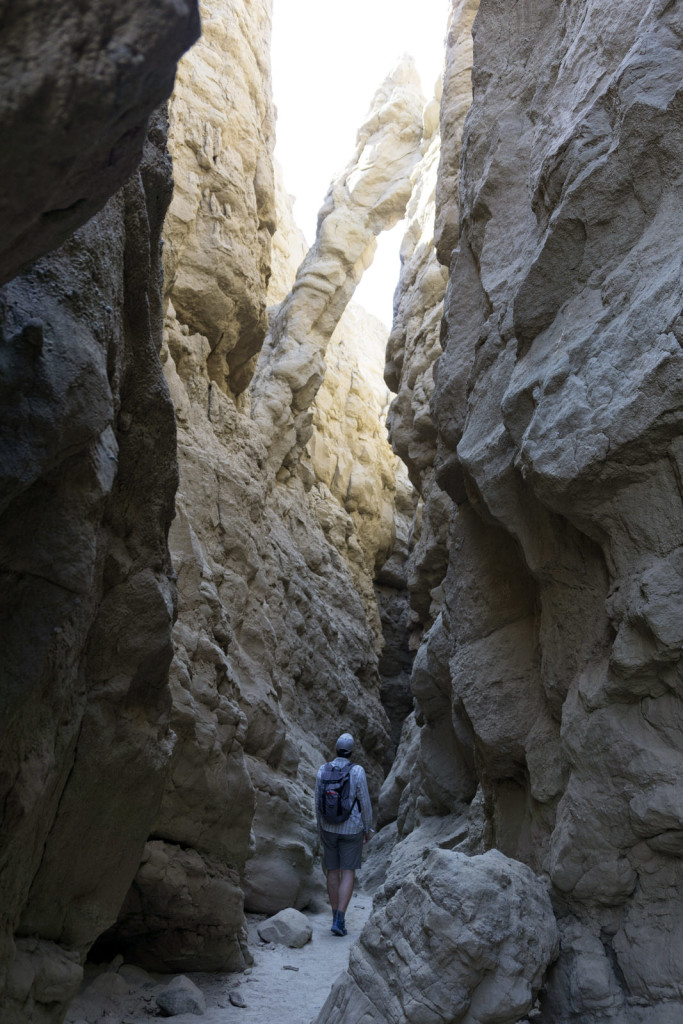
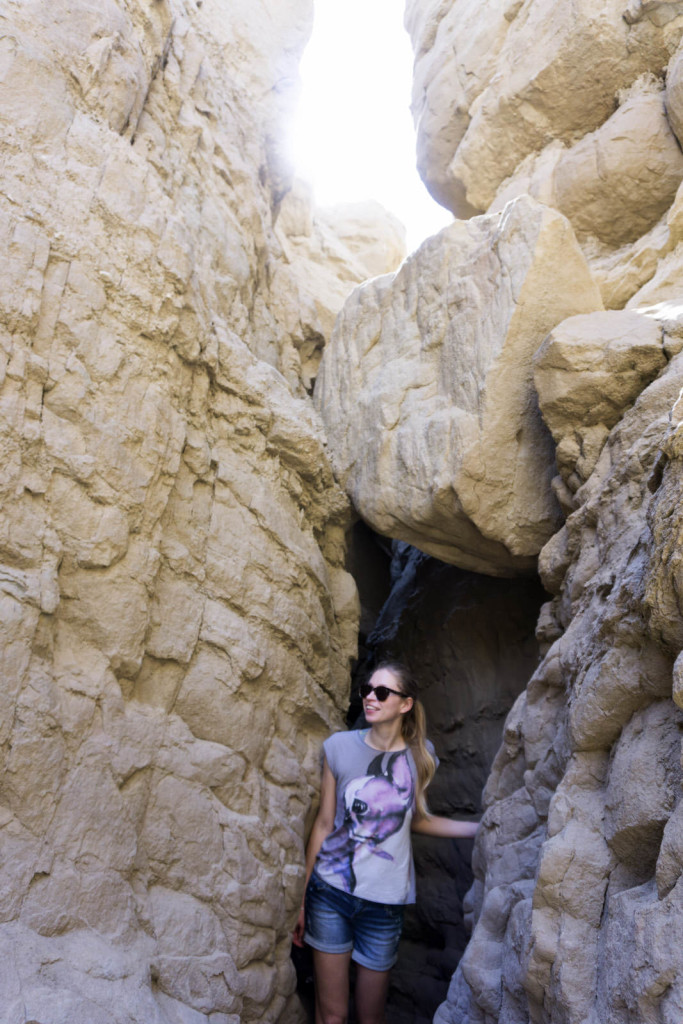
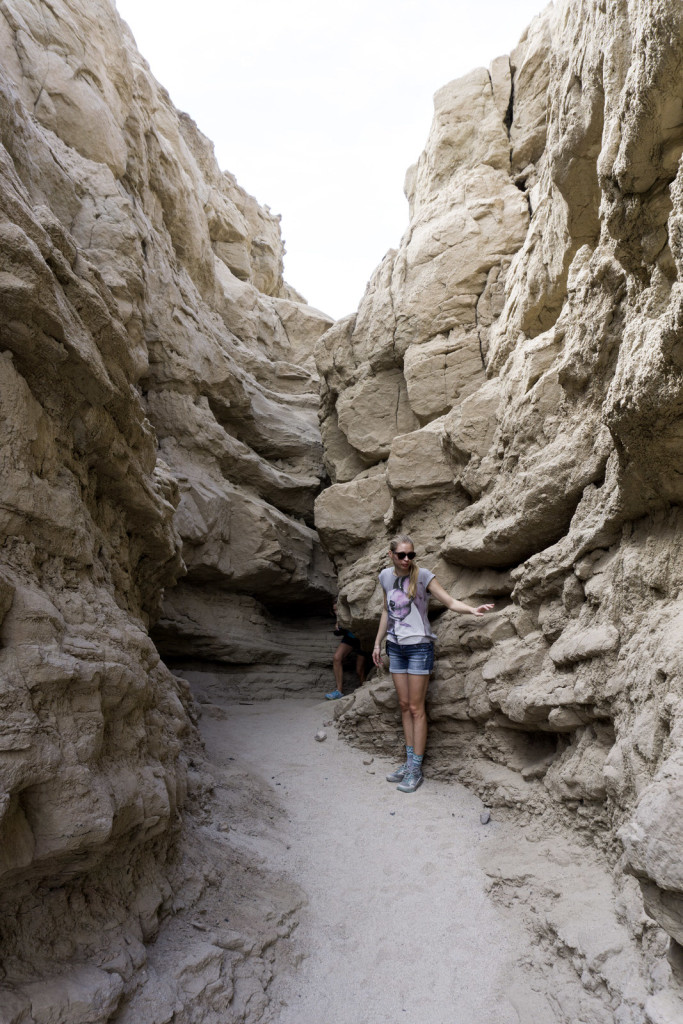
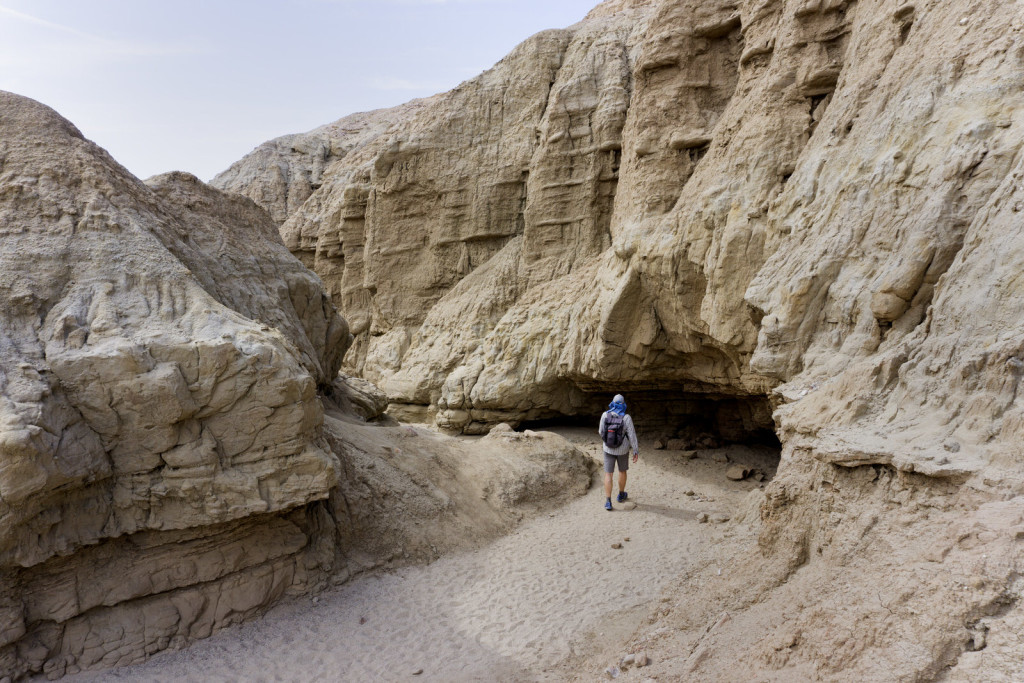
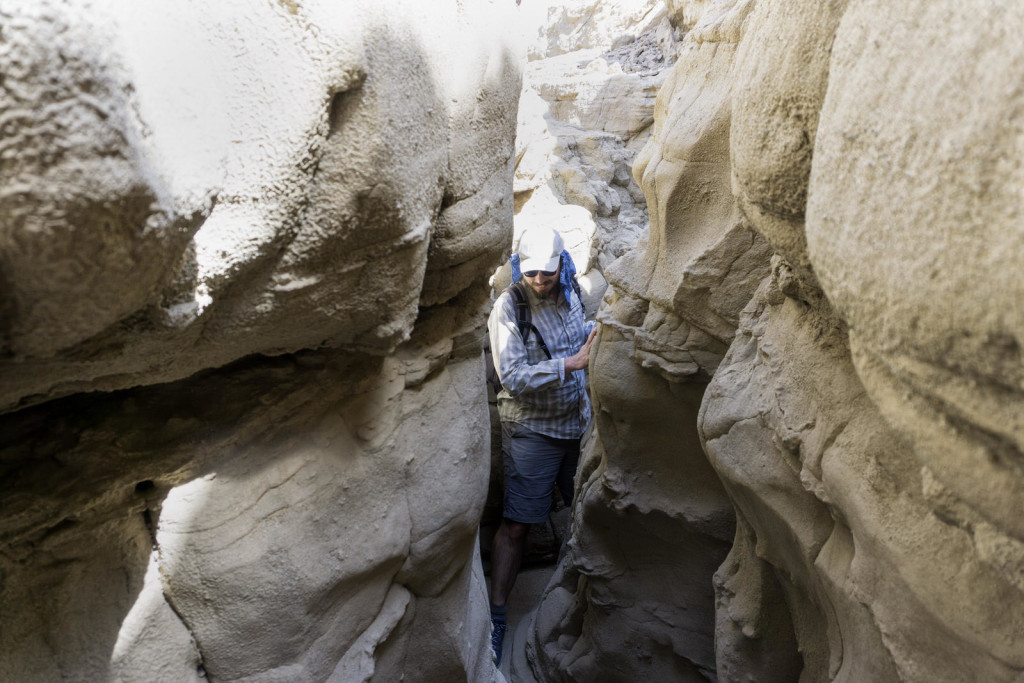
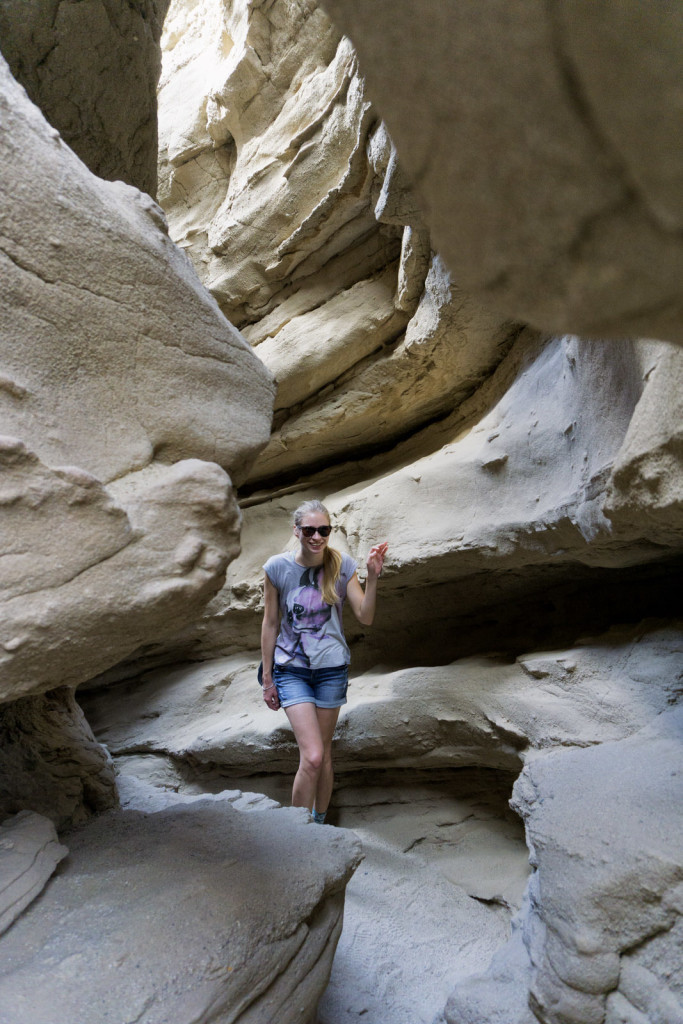
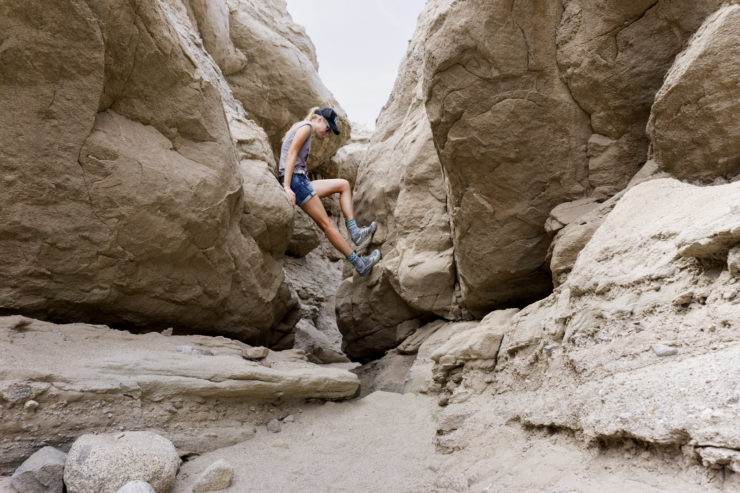
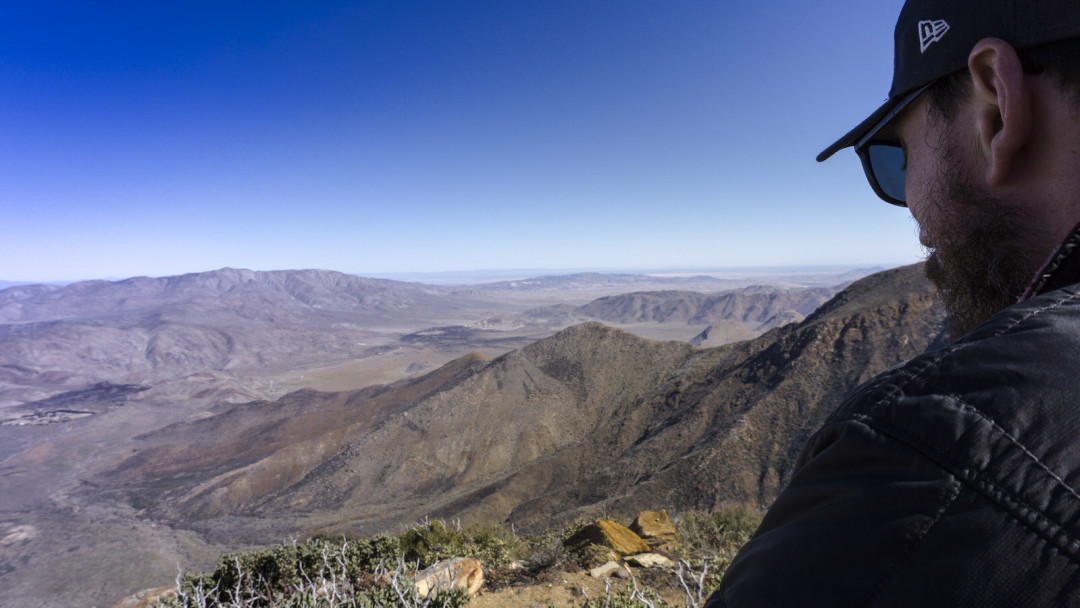
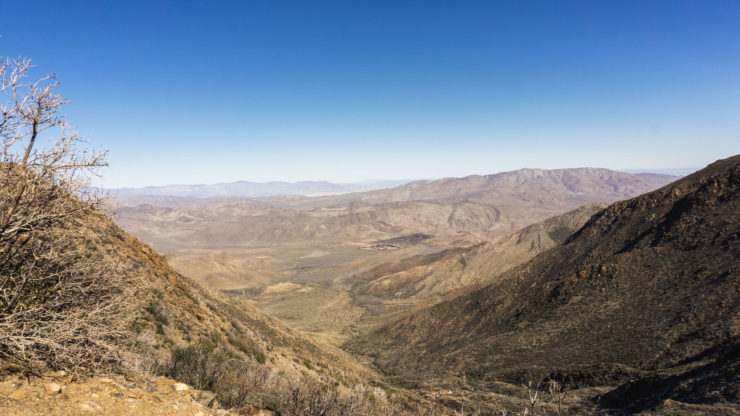
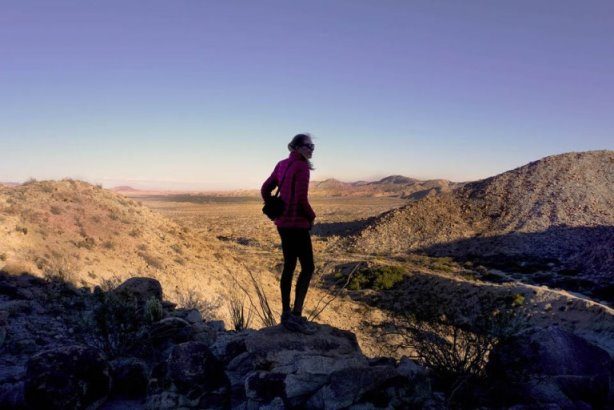
Ok, enough boring introductions time to get real about how we were actually looking for “adventures” in the slot canyon. Before we went on this trip I looked so many pictures of the canyon itself and how to get there that it didn’t occur to me to check the trail map itself. At the beginning we walked a little around to scope the area till we started going down to the canyon. The deeper we went, the higher and tighter canyon walls got ( this is when you know that you are at the right spot). There are some places where the whole body is touching canyon walls when passing. Once we were almost at the end of the canyon (and the canyon doesn’t stop it just gets wider and people with four wheelers actually can drive there from another side.) we decided to explore a little more. Canyon has “branches” that goes to different directions from the “main” canyon trail. We started walking on one of them till we climbed up and reached the top of the canyon. We could see our car in the distance and the bottom of the canyon on another side of the”wall”. For some reason, we thought it was a good idea to keep walking on unstable edges. The dirt was slipping underneath the feet with every step and we watched it going down to the canyon. We just kept walking and hoping that we will be able to reach normal ground soon, but the further we walked we noticed that we were going to the dead end. Then, we thought it was a good idea just try to get somehow down to the main canyon trail. We slid down from where it looked we could easily and safely access the ground but it was a mistake. Where we landed the ground was still too far away and the canyon walls were too fragile even to try safely climb down. We needed to climb back to the top of the canyon by fighting falling dirt and the unstable wall of the cliff. When we finally got up we tracked back the path we came and returned to the main canyon trail. We decided that it was enough of adventure and returned back to the car. Adventures makes life more exciting. That way you discover something new!

Trailhead address: Borrego Mountain Wash, Anza-Borrego Desert State Park, Borrego Springs, CA 92004
Trailhead coordinates: 33.182132, -116.214176 (33° 10′ 55.67″N 116° 12′ 51.03″W)

Happy Trails!


Anza Borrego dykuma tai viena iš mano mėgstamiausių vietų San Diege su daugybę takų ir pasislėpusių vietų, įvariausių akmenų ir įspūdingų kraštovaizdžių. Reikia tik laiko, kad aplankyti visa tai. Anza Borrego dykumoje yra pasilepęs kanjonas apie kurį sužinojau visai neseniai, tad privalėjau būtinai jį aplankyti.

Šis kanjono maršrutas yra tik 1.3 km ilgio tad puikiai tinka visai šeimai, tačiau jei esate jautrūs aukštai temperatūrai, siūlyčiau aplankyti šią vietą žiemą arba pavasarį, kai temperatūra yra ne tokia aukšta. Nepamirškite su savimi pasiimti daug vandens, kremo nuo saules ir gero fotoaparato visiems įspūdingiems vaizdams įamžinti.

Nors ir kanjonas yra pažymėtas žemėlapyje, tačiau surasti jį yra gana sudėtinga. Tad prieš vykdami siūlyčiau pasiplanuoti kelione į priekį. Jei atvykstate keliu nuo 78 rytų pusės pasukite į kairę, į Buttes Pass žvirkelį ir sekite kelią iki kol privažiuosite “stovėjimo aikštelę”. Palikę automobilį leiskitės žemyn į kanjoną ir pradėkite eiti kanjonu kairėn pusėn.

Gerai,  užteks nuobodžių pristatymų laikas papasakoti apie tikruosius”nuotykius” įvykusius kanjone. Prieš  nusprendžiant aplankyti šią vietą aš tik pasidomėjau kaip iki ten nuvažiuoti, bet apie patį kanjono taką visai pamiršau pasiskaityti. Tad kai atvažiavome šiek tiek paklaikdžiojome aplinkui kol galų gale nusileidome į kanjoną. Kuo tolyn sekėme kanjono keliu tuo sienos tapo aukštesnės ir siauresnės. Kai kuriose vietose kanjono sienos taip susiaurėja, kad net visas kūnas liečiasi prie sienų. Pagrindinis kanjono pėsčiųjų takas baigiasi tuom met kai sienos pradėda platėti iki tiek, kad galima privažiuoti su keturiais ratais varomomis transporto priemonės iš kitos pusės. Beeidami kanjonu negali nepastebėti atsišakojimų ( lyg ir atskirų takų lyg ir ne). Kadangi šis maršrutas nebuvo toks jau ilgas ir mes nepavargome nusprendėme, kad visai būtų smagu pavaikščioti aplink daugiau. Tad pasirinkę vieną iš kanjono atsišakojimų patraukiame tolyn, kol atsiduriame ant pačio kanjono viršaus ir iš toli galime matyti automobilių stovėjimo aikštelę, o pažvelgę žęmyn is abiejų pusių kanjono takus ir takelius. Eidami viršūnėmis jaučiame kaip lyg su kiekvienu žingsniu žvyro ir žemės mišinys rieda žemyn. Ir užtektų menkiausio lygsvaros praradimo ir gali slysti visais akmenimis ir žvyru žemyn. Nusprendę, kad tai ne pats geriausias sumanymas stengiamės kaip nors atsidurti kanjono apačioje. Pasirinkę kaip ir gerai matoma kelia žemyn pradedame leistis. Deja, viduryję leidimosi pamatėme, kad atstumas nuo kur reikes šokt nuo skardžio žemyn buvo per aukštas, tad vėl tenka kopti aukštyn ir kautis su žvyru tempenčiu žemyn su kiekvienu rankos ir kojos pakelimu. Galų gale žvyruoti ir dulkėti atsiduriame ant konjono viršūnėje ir sekame savo pačių pėdsakus atgalios.  Už vieno kito pusvalandžio mes jau automobilyje ir riedame namo džiaugdamiesi, kad dar vienas nuotykis baigėsi laimingai.


anza borrego overview of the slot canyon anza borrego slot canyon girl in the canyon in anza borrego desert girl in the canyon girl in the slot canyon, San Diego girl in the slot canyon man walking in the slot canyon anza borrego narrow canyon slot canyon

Kwaaymii Point – An Easy Hike For Everyone

Kwaaymii Point Trail Overlook of mountains and desert

I constantly look for new hikes in San Diego. Sometimes it can be frustrating due to the location: in the North – Los Angeles, in the South – Mexico, East – dessert, West – water. Usually, all the cool trails are couple hours away from where we live, but all so worth to visit. Here and there I “get” itchy feet to go somewhere, sometimes I  just want an easy and flat hike, other times full body torturing experience. Recently I was browsing online looking for new trails in San Diego and came across to Kwaaymii Point in Cleveland National Forest. It caught my attention that the spot is popular among hang gliders and my first thought was, that it should be easily accessible with great views of the desert and mountains and I was right! Kwaaymii Point trail is on the Pacific Crest Trail and it makes everyone who is into hiking a little more excited  (in this case it was Mr. J). Kwaaymii Point Trail is only 0.5-mile length and flat so it is great for children and elder people. We parked the car at the Pioneer Mail Picknic Area and started walking towards the sign of PCT.  Since it was an easy and short stroll we just continued walking on the PCT for a while till we felt that it was enough and turned around. Kwaaymii Point Its not your regular trail, for some people it is a special place. By being there, you cannot notice plaques on the rocks of people who died ( they didn’t die there), families and friends memorialized them. There was even a plaque for a dog. I believe there are people who come there regularly to look for inspiration or just think. We met a man who was casually sitting by the raill next to his car and smoking a cigarette while looking in the distance, when we passed him he said a friendly hello and I kept wondering what was on his mind that he came all the way up there.

***

Dažnai paskestu interneto platybėse beiškodama naujų vietovių ir mašrutų, kuriuos būtų galima nesunkiai pasiekti iš San Diego.  San Diegas isikūręs taip, kad jei keliauji pietų pusėn atsiduri Meksikoje, šiaurėje – Los Andželas, vakaruose – vandenynas, o rytuose – dykuma. Dažniausi visi įdomesni žygių keliai yra kiek atokiau nuo San Diego rytuose, ir iki jų dasigauti gali užtrukti iki 2 valandų. Ši mini kelionė su visais pietais ar vakarienės sustojimais pakelėse gali užtrukti ir visą dieną, tad savaitgalius reikia kartais papalnuoti į priekį. Kad ir kaip ten bebūtų, kiek laiko užtruktų visada vaizdai ir įspūdžiai nenuvilia ir pakrauna geros energijos keliom savaitėm į priekį, iki kol vėl kojas pradeda “niežėti” naujiems žygiams. Tad neperseniausiai suradau Kwaaymii Point  Klyvlendo Parke. Ši vietovė mane sudomino tuo, kad čia susirenka sklandytuvų mėgėjai  ir iš kart pagalvojau, kad tai turėtų būti lengvai privažiuojama vieta su nuostabiais dykumos ir kalnų vaizdais ir žinoma aš neklydau. Pro Kwaaymii Point eina Ramiojo Vandenyno Keterų Trasa (PCT arba Pacific Crest Trail) visi, kurie bent kažkiek domisi keliavimu pesčiomis žino kas tas per trasa. Misteris J. visada šiek tiek šokinėja iš laimės kai gali bent, kad ir trumpam pasivaikščioti PCT.  Kwaaymii Point tai lengvai prieinamas 0,8 kilometrų ilgio lygus takas, prieinamas tiek mažiem tiek dideliem. Mes pasistatėme automobili Pioneer Mail pikniko vietoje ir pajudėjome į priekį, kur buvo sužymėta PCT kelias. Kai praėjome Kwaaymii Point mes dar šiek tiek paėjome į priekį iki kol nusprendėme, kad abiems yra gana ir apsisukome keliauti atgal. Kwaaymii Point tai ne šiaip sau graži vieta su nuostabia panorama, ši vietovė įpatinga. Eidami negali nepastėbėti lentučių pritvirtintų prie uolų ir akmenų mirusiems žmonėms atminti. Tie žmonės nemirė šioje vietoje, tiesiog artimieji ar draugai norėdami atminti ir pagerbti jų atminimą juos iamžino šioje vietoje. Netgi suradome lentelę atminti šunį. Tikrai tikiu, kad yra žmonių, kurie atvažiuoja čia regulariai apmastyti mintis, pasisemti įkvėpimo. Kaip tik beeidami atgal sutikome vyrą kuris sau sėdėjo netoli automobilio ir rūkydamas cigaretę žvelgė į horizontą. Prasilenkdami jis maloniai pasisveikino, o aš nenustojau galvoti kas per mintys jį privertė čia atvažiuoti.

Mountains-and-Anza-Borrego-Desert Kwaaymii Point Trail Kwaaymii Point memorium Plaques Kwaaymii Point PCT-sign- PCT Kwaaymii Point Trail

Life accomplishment: I sewed a jacket with lining B6169

Sewed a motto style jacket Butterick pattern B6169 motto style jacket

Mostly I write about my adventures in hiking and traveling, but I like doing crafty things too and it is adventurous in its own unique way. So finally I embraced myself and I did it! I sewed my first piece of clothing – jacket by Butterick B6169 pattern.  Last year I received the sewing machine for Christmas and  I was all about making my own clothes. Being a tall girl sometimes can be challenging in finding clothes that actually properly fits the body. I took a class “Sew like a professional” in San Diego Continuing Education. I decided to go to the advanced class just because I wanted to make something really cool and I had some previous experience in sewing. I can’t believe how much I didn’t know and probably taking beginners class would be a better idea. But oh well I studied at home a lot all the techniques and other stuff about sewing and spent hours working on my jacket so that I could finish it before the class ends. I am very pleased with the final result.

I sewed a moto-style jacket from Butterick B6169 I did all the adjustments on a pattern paper and as well as made a muslin. It was a requirement in the class and I am glad that I did it. Now I know that for a bigger project like this tissue fitting on a pattern is not enough. I followed Lisette blog for step by step pictures how to make the jacket.  And of course the most help I received from my teacher and more advanced classmates. I really happy how it turned as a first project. Now I am stepping down and taking a class “Sewing fundamentals II” to learn all the things that I am missing still and the final project will be a button up shirt. Stay tuned!


***

Dažniausiai rašau apie įvairius nuotykius, žygius ir keliones, bet aš taip pat mėgstu užsiimti visokiausiais rankdarbiais ir tai sakyčiau savotiškas nuotykis tap pat. Tad pagaliau pasirįžau vienam dideliui siuvimo nuotykiui – moto stiliaus švarkeliui su pamušalu. Naudojau Butterick  B6169 iškarpas. Kaip tik anais metais kalėdoms dovanų gavau siuvimo mašiną ir labai niežėjo pirštus ką nors ypatingą ir grandiozinį pasiūti. Kita priežastis išmokti siūti tas nelemtas aukštas ūgis (o kaip susirimavo galėčiau kaip Maironis eilarščius kurti apie gyvenimiškas problemas būnant aukštai). Tad susiradau siuvimo kursus čia San Diege ir su visa mašina, siūlais, adatom ir kitais kakinimo įrankiais skūbėjau po darbo kartą per savaitę kelis menesius. Kaip tyčia pasirinkau pažengusiems skirtus kursus manydama, kad na kaip nors aš išsikapanosiu. Na ir aišku buvo baltos varnos momentų, bet daug laiko skyriau namų darbamas skaitydama įvairią literatūrą ir žiūrėdama Youtube.

Siuvau moto stiliaus švarkelį iš Butterick B6169 iškarpų. Pradžioje visus taisymus atlikau iškarpose, o vėliau jau iš pataisytų iškarpų siuvome “muslin” tai lyg ir juodraštis prieš perkeliant viską ant pasirinktos medžagos. Dažniausiai “juodrštis” siuvamas iš paprastos medvilninės medžagos ir tada daromi paskutiniai primatavai, pataisymai ir tada viskas perkeliama į tikrąją medžiagą ir siuvama. Naudojausi pateiktomis iškarpų instrukcijomis taip pat suradau blogą, kuris buvo pateikęs detalius žingsnius su nuotraukomis kaip siūti. Pabaigusi šiuos kursus pradėjau naujus “Siūvimo pagrindai II tikiuosi dar labiau papildyti žinių bagažą. Šių kursų projektas – marškiniai. Tad kai jau baigsiu tai jau pasimaivysiu ir pasirodysiu čia.

Sewing jacket with lining Butterick B6169 Moto Lined Jacket B6169 Moto Jacket sewed Butterick B6169 Sew A Jacket B6169 S

New blog name from Martyna-Papartyna to Journey Six Feet

Hello World,

I give up this blog will never be perfect. But at least it is a good start. So look at me, I got a  new domain name and moved from Blogger to WordPress. The name of the blog changed because I thought its time to move to something more universal and easier to pronounce than Martyna-Papartyna. Journey Six Feet sums up everything who I am and what I am doing and there is still so much space for what it can become. Since I have never worked with WordPress it’s quite challenging so many new things to learn and the current state of my blog is not final. I accept help so if you know someone let me know, wink wink…

It’s just a test page.

Stay tune!

***

Sveikas pasauli,

Pasiduodu, šis tinklaraštis niekad nebus tobulas. Bet sakyčiau visai gera pradžia. Taigi, pagaliau prisiverčiau įsigyti normalų tinklaraščio pavadinimą ir persikėliau iš Blogger į WordPress. Pakeičiau tinklaraščio pavadinimą, nes atėjo laikas kai Martyna-Papartyna užaugo į Journey Six Feet, kas išvertus į Lietuvių kalbą reiškia Kelionė Šešios Pėdos. Šis naujas vardas/pavadinimas aprėpia daugiau kas esu ir ką veikiu ir palieka daug vietos kuo gali patapti. Kadangi niekada nesinaudojau WordPress prireiks daugiau laiko išmokti visas subtilybes priimu pagalba taigi jei pažįsti kas galėtų man padėti mirkt mirkt…

Čia tiesiog testuoju puslapį.

Iki pasimatymo!